Real Case Scenario
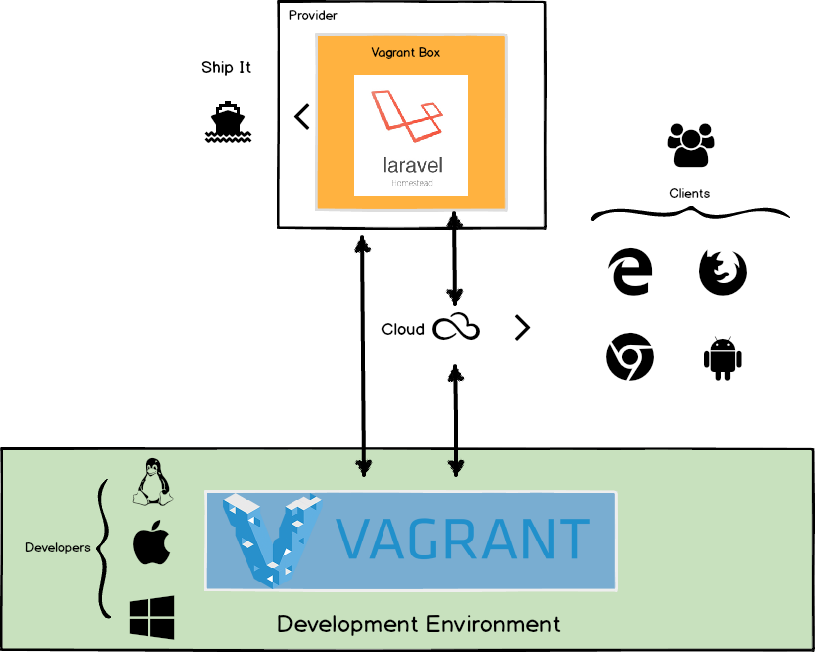
Lets suppose that we are a web developer inserted in a development team and we have to do a REST API for a entrepreneurship platform and we will use Laravel to make it. Using the vantages that Vagrant tool give to us we can have a full ready to use,configurable,flexible development environment within a few time.
Let's Start
Instalation
To use Vagrant we need a virtualization software, we can use Virtual Box, VmWare or other. In this guideline we will use VirtualBox as provider because is free and exists on many platforms.
Go to Virtual Box download page and select the appropriated version for your platform. In our case we choose Ubuntu 14.04("Trusty") i386|AMD64 because this machine is running a Linux/GNU based distro , most specifically elementary OS 0.3.1 Freya (64-bit) Ubuntu 14.04 Based.
After download and install VirtualBox we have to download Vagrant , so go to Vagrant download page select your version and install.
To check if the installation process was succeeded open your command line and type vagrant -v.
Boxes
Let's start first lets talk about vagrant boxes , "Boxes are the package format for Vagrant environments. A box can be used by anyone on any platform that Vagrant supports to bring up an identical working environment."(Vagrant Docs). Vagrant has a public box catalog with all kinds of environments.
Laravel
To show a real case example how vagrant can boost the time that we take to deploy a piece of software i will use a Laravel base project .
Laravel is a very complete PHP framework used to design web applications , REST services or just a simple web site, is recognized by her elegance, simplicity, and readability of code. To read moore about Laravel just deep into their site.
To start a Laravel project have to fill the server requirements and configure our computer to support a application , or ... just do the vagrant way.
Laravel have a specific ready to use box to support our applications , the Homestead , so go to Atlas (Vagrant box catalog ) and search laravel/homestead to see versions log.
Add Homestead Box
To add Homestead to boxes just open your terminal and type vagrant box add laravel/homestead
If you do vagrant box list you can now see homestead listed on your boxes.
Install Homestead
To install Homestead on your environment you have to clone it from Laravel github repository
git clone https://github.com/laravel/homestead.git Homestead
Go to Homestead folder and run the initial script
bash init.sh
This will create the Homestead.yaml configuration file. The Homestead.yaml file will be placed in the ~/.homestead hidden directory.
The yaml file contains the box configurations like ip , memory , cpus , the provider.
Edit the yaml file nano Homestead.yaml
authorize: and and keys: are the ssh key files
folders: are the mapped folder between the box and your machine
sites: are the mapped sites
databases: the databases used by the box
Creating Project
Now we are ready to create a Laravel project ,go to the folder that is mapped on yaml file folders configuration just doing:
mkdir ~/Code
If you dont have yet a id_rsa file you have just to do ssh-keygen -t rsa and choose the default directory. To see moore info about ssh keys consult this link. Like we saw it on Homestead.yaml this will be needed to start to the box.
Start the box : vagrant up
Enter the box : `vagrant ssh
To start a Laravel project we need composer, Composer is a application level package manager for PHP, it provides a standard format for managing dependencies of PHP software and required libraries. For more information about composer go to their site.Homestead have composer installed by default, Yay!!!
composer create-project --prefer-dist laravel/laravel PROJECTNAME
This will create a folder on the mapped folder with the name that you give.
Exit the box: exit
Shutdown the box: vagrant halt
Go to the mapped folder (~\Code) and you can now see your project folder there.
You have now to map your site in the yaml fille:
Edit sites configuration to match your project
- map: homestead.app
  to: /home/vagrant/Code/PROJECTNAME/public
Now just add homestead.app ,or the name that you gave to it, to the /etc/hosts on your machine.
Edit the file
sudo nano /etc/hosts
Add ip_adress hostname where ip_adress is the box ip , placed on yaml file , and hostname is the name that you give on sites configuration
Done ,run vagrant provision to start setup your box with the new configurations,and run again vagrant up to start the box.
Now in your browser access to the hostname of the site (homestead.app) and a Laravel welcome page must be displayed.
"Vagrant up is all you need to work on any project, to install every dependency that project needs, and to set up any networking and synced folders so you can continue working from the comfort of your own machine."